Monday, March 18, 2013

Packaging and Deploying InfoPath forms as SharePoint Sandbox Solutions via Visual Studio 2010


Introduction


SharePoint 2010 allows two ways of deploying InfoPath form templates containing business logic driven by managed code:
  1. Sandboxed solutions enable users to upload form templates with code or data connections in environments without full trust.
  2. Administrator-approved form templates are individually verified, uploaded, and activated by an administrator with full trust to the domain. More information on this is available here. http://technet.microsoft.com/en-us/library/cc262921.aspx

Any custom solution developed for SharePoint can only be deployed as a WSP package.  So if a custom solution contains an InfoPath form template, then following the deployment practice it’s required to package the form template in the form of a WSP.
This post focuses on how we can deploy an InfoPath 2010 form template with managed code as a sandbox solution using Visual Studio 2010 SharePoint project template.
The approach discussed in this post revolves around the Forms Services web service which provides methods to interface and work with InfoPath forms on SharePoint.
The Form Services web service exposes various web methods which allow interacting with forms published on the SharePoint server. Out of these methods, following are the two methods of our interest:
  1. BrowserEnableUserFormTemplate
  2. DesignCheckFormTemplate


BrowserEnableUserFormTemplate

 
This web method converts a form template at the specified SharePoint URL in a format that can be rendered in a Web browser. This method interns coverts the InfoPath form template with managed code as sandbox solution and uploads the same to the Solutions gallery of the site collection.
Parameter Name
Description
Example Values
formTemplateLocationA string representing the url of the form template.http://siteurl/library/forms/template.xsn

DesignCheckFormTemplate

 
Allows verifying whether an InfoPath 2010 form template can open and work correctly in a Web browser.
Parameter Name
Description
Example Values
lcidA string containing the locale id of the SharePoint site.1033
base64FormTemplatebase64 encoded current form template string.
applicationIdThe version of the InfoPath. This parameter must have value as InfoPath 14.InfoPath 14


Note: While publishing a form to SharePoint, InfoPath 2010 designer internally makes several calls to different SharePoint web services including the theses two methods of the Forms Services web service.


Article Prerequisites


In order to develop and execute the sample application used to demonstrate the approach, you must have the following:
  • Microsoft Visual Studio 2010
  • InfoPath Designer 2010
  • Microsoft Visual Studio Tools for Applications
  • A server that is running Microsoft SharePoint Server 2010


Solution Approach


The approach is divided in to the following part:
  1. Getting the SharePoint Environment Ready.
  2. Creating an InfoPath 2010 form template with managed code
  3. Creating the VS2010 solution
  4. Viewing the sample application.


Getting the SharePoint Environment Ready

Let’s first start by setting the SharePoint site to work with this sample.
  1. On your target SharePoint 2010 site collection, login as a site collection administrator and create a sub site using the Team Site template.
  2. On the newly created team site, add a new form library and name it EmployeeRecords. This will be the library where we will deploy our sandbox InfoPath form.
  3. Now create a new web part page named EmployeeForm on the team site under the Site Pages library.
  4. On the EmployeeForm web part page, add a new InfoPath Form Web Part available in the Forms category.


 Figure 1: Adding InfoPath Form Web Part


  1. Save the page and exit the page design mode.

In the above steps, we have added a web part page which will surface the InfoPath form from the EmployeeRecords form library via the EmployeeForm web part.


Creating an InfoPath 2010 form template with managed code

In this section we’ll be creating the InfoPath form with code behind to be hosted as browser-enabled form. The form template will contain a repeating table and two buttons with managed code allowing the user to add/remove rows in the repeating table.
  1. Create a blank InfoPath form.
  2. Add a new repeating table with 3 columns to the design surface. This action will add a group group1 along with its child group and fields under myFields in the form main data source.
  3. Now rename the repeating table groups and fields as shown in the image below:

Figure 2: InfoPath Form field schema

  1. Add two new button controls to the form design surface.
  2. From the button properties, set the first button’s label to Add Record and ID to AddRecord.
  3. Similarly, set the second button label as Delete Record and ID as DeleteRecord.
  4. In the form design surface, right click on the Employee repeating table and select Repeating Table Properties.
  5. On the Data tab in Repeating Table Properties window, uncheck the Allow users to insert and delete rows check box. Click Ok to close the properties.
This will hide the OOB insert menu on the repeating table thus restricting the end users to add/remove rows directly from the context menu.

Figure 3: Repeating Table Properties

  1. You can further update the form’s look and feel as required. Click Save to save the InfoPath form on the file system. Specify the form name as Employees.xsn.

Figure 4: Employee Information Form in design mode

  1. On the Developer tab inside the InfoPath form, click Language.
  2. Make sure the Form template code language is set to C#. Optionally you can also change the Project location.
  3. Click OK to close form options.
  4. On the developer tab click Code Editor to launch VSTA project for this form.
  5. Back in the InfoPath form, select the button Add Record and from the Properties ribbon tab, click Custom Code button to generate the click event handler for this button.
  6. In the VSTA project, replace the following code segment
public void AddRecord_Clicked(object sender, ClickedEventArgs e)
       {
           // Write your code here.
 }

With:
 
public void AddRecord_Clicked(object sender, ClickedEventArgs e)
       {
            const string employeegroup = "/my:myFields/my:Employees";
               XmlDocument xmldoc = new XmlDocument();
//Create a navigator at the employeegroup xpath.
               XPathNavigator employeeNavigator = MainDataSource.CreateNavigator().SelectSingleNode(employeegroup, NamespaceManager);
               if (employeeNavigator != null)
               {
//Create a new repeating group.
                   XmlNode group = xmldoc.CreateElement("EmployeeGroup", NamespaceManager.LookupNamespace("my"));
                   if (group != null)
                   {
//Create new repeating fields.
                       XmlNode name = xmldoc.CreateElement("Name", NamespaceManager.LookupNamespace("my"));
                       group.AppendChild(name);


                       XmlNode id = xmldoc.CreateElement("ID", NamespaceManager.LookupNamespace("my"));
                       group.AppendChild(id);


                       XmlNode age = xmldoc.CreateElement("Age", NamespaceManager.LookupNamespace("my"));
                       group.AppendChild(age);


                       xmldoc.AppendChild(group)
// Add the new repeating group back to the main group.       employeeNavigator.AppendChild(xmldoc.DocumentElement.CreateNavigator());
                   }
               }
           }
           catch
           {
               // Display on UI/Log.
           }
 }
In above button event code, we are adding a new row to the Employee repeating table. Build the solution to save changes.
Note: The XPath of the Employee group can be obtained by right clicking the Employee group in the form fields task pane and select Copy XPath from the context menu.

  1. Back in the InfoPath form, select the button Delete Record and from the Properties ribbon tab, click Custom Code button to generate the click event handler for this button.
  2. In the VSTA project, replace the following code segment
public void DeleteRecord_Clicked(object sender, ClickedEventArgs e)
       {
           // Write your code here.
 }
 
With:
 
public void DeleteRecord_Clicked(object sender, ClickedEventArgs e)
       {
try
           {
               const string employeegroup = "/my:myFields/my:Employees";
               //Create a navigator at the employeegroup xpath.
               XPathNavigator employeeNavigator = MainDataSource.CreateNavigator().SelectSingleNode(employeegroup, NamespaceManager);
               if (employeeNavigator != null)
               {
                   // Select all the childrens.
                   XPathNodeIterator iterator = employeeNavigator.SelectChildren(XPathNodeType.Element);


                   // Move to the first children.
                   iterator.MoveNext();
                   // Check if this is the last row or not.
                   if (iterator.Count > 1)
                   {
                       XPathNavigator current = iterator.Current;
                       // Delete the element.
                       current.DeleteSelf();
                   }
                   else
                   {
                       // Call the AddRecord method to add a blank row as last row.
                       AddRecord_Clicked(null, null);
                       // Delete the last row.
                       XPathNavigator current = iterator.Current;
                       current.DeleteSelf();
                   }
               }
           }
           catch
           {
               // Display on UI.
      }
 }

In above button event code, we are removing the first row in the Employee repeating table. Also when we reach the last row in the table, then we call the AddRecord_Clicked method to insert a blank row.

  1. Build the solution and close VSTA editor. Now the next step is to make the form template ready to be published as a sandbox solution.
  2. Back in the InfoPath client, click on File menu to open the office backstage area and select click Publish.
 Figure 5: InfoPath Backstage Area
  1. Click SharePoint Server to publish the form to SharePoint.

Figure 6: InfoPath Backstage Area - Publish Menu

  1. Enter your SharePoint team site URL and click Next.
Figure 7: Publishing Wizard

  1. Select Administrator-approved form template (advanced) option and click Next.
Figure 8: Publishing Wizard

  1. In the next window, click Browse to open the local folder where you saved the form.
  2. Create a new folder PublishedForm and save the form as Published_Employees.xsn.
  3. Click Next button twice.
  4. Click Publish to publish the form to the selected folder and then click Close.
  5. Close InfoPath designer.

In the above steps we have published the form as an Administrator-approved form template. This updates the form manifest file with some required changes and enables the form to be published as a sandbox solution.


Creating the VS2010 solution

In this section, we will create a VS2010 SharePoint solution which will deploy the form we created in the above section as a sandbox solution.
  1. Create a new Empty SharePoint Project and name it InfoPathSandboxDeployment. Ensure that InfoPathSandboxDeployment is deployed as a Farm solution on the team site we created in the above section.
  2. Add a new web scoped feature to the InfoPathSandboxDeployment project and name it EmployeeForm. Update the feature display name and description as per the image below.

Figure 9: Employee Record Form feature

  1. Right click on the EmployeeForm feature in the solution explorer and select Add Event Receiver from the context menu to add the feature receiver class for this feature.
  2. Figure 10: Adding Event Receiver

    Later we will hook the necessary code in the feature receiver to deploy our form template when the EmployeeForm feature is activated.
  3. Now add a new Module SharePoint item to the project and name it InfoPathForms. The InfoPathForms module will contain the InfoPath form template we want to deploy.
  4. Note: The InfoPathForms module automatically gets added to the EmployeeForm feature as shown below.
    Figure 11: Employee Record Form Feature with InfoPathForms module

  5. Remove the default Sample.txt file from the module.
  6. Copy the Published_Employees.xsn form from the PublishedForm folder and paste it under the InfoPathForms module. 
  7. Note: It’s mandatory that you copy the published Published_Employees.xsn file and not the original Employee.xsn. 
  8. From the Elements.xml file under the InfoPathForms module, remove the following file tag.
  9. <File Path="InfoPathForms\Published_Employees.xsn" Url="InfoPathForms/Published_Employees.xsn" />
  10. Add a Web Reference in the project to the Forms Services web service at the following URL and provide the web reference name as FormsService: http://siteurl/_vti_bin/formsservices.asmx
  11. Figure 12: Forms Service Web Service
  12. Add new class file to the project and name it SharePointHelper. The SharePointHelper class will contain helper methods to support the deployment.
  13. Add new class file to the project and name it FormsServicesHelper. The FormsServicesHelper class will contain methods wrapping the Forms Services web methods.
  14. At this stage, your project should look similar to the image below. Now we are all set to write the required code to deploy our form as a sandbox solution to SharePoint. 
  15. Let’s start by adding code to the SharePointHelper class. In the SharePointHelper class, replace the following code segment
    using System;

    using System.Collections.Generic;

    using System.Linq;

    using System.Text;


    namespace InfoPathSandboxDeployment

    {

       class SharePointHelper
       {
       }
    }


    With:
    using System;
    using System.Collections.Generic;
    using System.IO;
    using System.Linq;
    using Microsoft.SharePoint;
    using Microsoft.SharePoint.Utilities;


    namespace InfoPathSandboxDeployment
    {
       // Helper functions for SharePoint operations.
       public class SharePointHelper
       {
           ///


           /// Provisions the given file stream as file in SharePoint library.
           ///


       /// SharePoint library.
       /// Stream to be provisioned.
       /// SharePoint file object.

       public static SPFile ProvisionFileToFormsFolder(SPList list, Stream stream)
       {
           if (list == null)
           {
               throw new ArgumentNullException("list", "list cannot be a null reference.");
           }


           if (stream == null)
           {
               throw new ArgumentNullException("stream", "stream cannot be a null reference.");
           }


           try
           {
               // Gets the FORMS folder in the form library.
               SPFolder forms = list.RootFolder.SubFolders.OfType<SPFolder>().FirstOrDefault(i => i.Name.ToUpperInvariant() == "FORMS");
               if (forms != null)
               {
                   // Add the file with the name combining the site name, list name and file name.
                   string formName = string.Format(list.ParentWeb.UICulture, "{0}_{1}_template.xsn", (string.IsNullOrEmpty(list.ParentWeb.Name) ? list.ParentWeb.Title : list.ParentWeb.Name), list.Title);
                   SPFile formtemplate = forms.Files.Add(formName, stream, true);


                   return formtemplate;
               }
           }
           catch
           {
               throw;
           }


           return null;
       }


       ///


       /// Updates the content type document template.
       ///

       /// SharePoint list.
       /// New template path.
       public static void ChangeContentTypeDocumentTemplate(SPList list, string templatepath)
       {
           if (list == null)
           {
               throw new ArgumentNullException("list", "list cannot be a null reference.");
           }


           if (string.IsNullOrEmpty(templatepath))
           {
               throw new ArgumentNullException("templatepath", "templatepath cannot be a null reference.");
           }


           try
           {
               // Get the default content type.
               SPContentType ctype = list.ContentTypes[0];
               // Update the document template path.
               ctype.DocumentTemplate = SPUtility.ConcatUrls(list.RootFolder.ServerRelativeUrl, templatepath);
               // Update the content type.
               ctype.Update();
           }
           catch
           {
               throw;
           }
       }


       ///


       /// Copies and renames the form template file to the system default file name - template.xsn
       ///

       /// SPFile object for the file to be renamed.
       public static void CopyAndRenameFormTemplate(SPFile formTemplate)
       {
           if (formTemplate == null)
           {
               throw new ArgumentNullException("formTemplate", "formTemplate cannot be null.");
           }


           try
           {
               string folderPath = SPUtility.GetFullUrl(formTemplate.Web.Site, formTemplate.ParentFolder.ServerRelativeUrl);
               // Create a new path with new file name.
               string newFormTemplatePath = SPUtility.ConcatUrls(folderPath, "template.xsn");
               // Copy the old form template at the new path.
               formTemplate.CopyTo(newFormTemplatePath, true);
               // Delete the old form template.
               formTemplate.Delete();
           }
           catch
           {
               throw;
           }
       }


       ///


       /// Cleans the solution gallery by removing the previously deployed sandbox solution with the same name.
       ///

       /// Absolute URL of the site.
       /// Name of the solution to be deleted.
       public static void DoSolutionsGalleryCleanup(string url, string solutionName)
       {
           try
           {
               using (SPSite site = new SPSite(url))
               {
                   // Get the collection of all the sandbox solutions.
                   SPUserSolutionCollection userSolColl = site.Solutions;
                   // Find the solution name matching the priovided name.
                   IEnumerable<SPUserSolution> solutions = userSolColl.OfType<SPUserSolution>().ToList().FindAll(i => i.Name.Contains(solutionName));
                   foreach (SPUserSolution solution in solutions)
                   {
                       // Remove the solution.
                       userSolColl.Remove(solution);
                   }


                   // Gets the solution file reference from the Solutions gallery.
                   SPList solutionsGallery = site.GetCatalog(SPListTemplateType.SolutionCatalog);
                   List<SPFile> files = solutionsGallery.RootFolder.Files.OfType<SPFile>().ToList().FindAll(i => i.Name.Contains(solutionName));
                   foreach (SPFile file in files)
                   {
                       // Delete the file.
                       file.Delete();
                   }
               }
           }
           catch
           {
               throw;
           }
       }
   }
}

The above class contains the following 4 methods

  1. ProvisionFileToFormsFolderAdds the given stream of the form template as a new file on the given SharePoint library’s FORMS folder. The name of the new file is derived based on the current site name and current library name. Naming the file in this manner helps to keep the file name unique throughout the site collection once the form is deployed to the Solutions gallery.
  2. ChangeContentTypeDocumentTemplateUpdates the document template URL to the new URL of the default content type in the given SharePoint library.
  3. CopyAndRenameFormTemplate Copies the given SharePoint file to the same folder location with the name as template.xsn and deletes the original file. This helps to follow the SharePoint OOB way of naming the template files for a library.
  4. DoSolutionsGalleryCleanupCleans the site collection’s Solution gallery by deactivating and deleting the sandbox solution which matches the supplied solutionname. This method helps to clean the solution gallery every time the solution or EmployeeForm feature is activated.
  • Build the solution.
  • In the  FormsServicesHelper  class, replace the following code segment
    using System;
    using System.Collections.Generic;
    using System.Linq;
    using System.Text;


    namespace InfoPathSandboxDeployment
    {
       class FormsServicesHelper
       {
       }
    }


    With:
    using System.Linq;
    using InfoPathSandboxDeployment.FormsServiceProxy;
    using Microsoft.SharePoint;
    using Microsoft.SharePoint.Utilities;
    using System;
    using System.IO;


    namespace InfoPathSandboxDeployment
    {
       ///


       /// Forms services class containing
       /// helper methods for sandbox deployment.
       ///

  •    public class FormsServicesHelper
       {
           ///


           /// Static object of the formsservice class.
           ///

           private static FormsServicesWebService formsServiceProxyObj = null;


           ///


           /// Converts a stream object equivalent to base64 string.
           ///

           /// Stream object.
           /// Base64 tring equivalent of the stream.

           public static string ConvertStreamToString(Stream stream)
           {
               if (stream == null)
               {
                   throw new ArgumentNullException("stream", "stream cannot be a null reference.");
               }


               try
               {
                   string base64text = string.Empty;
                   var br = new BinaryReader(stream);
                   byte[] byteArr = br.ReadBytes((int)stream.Length);
                   if (byteArr != null && byteArr.Length > 0)
                   {
                       // Convert the stream to base64 strig format.
                       base64text = Convert.ToBase64String(byteArr, Base64FormattingOptions.None);
                   }


                   return base64text;
               }
               catch
               {
                   throw;
               }
           }


           ///


           /// Checks if the formtemplate can be browser enabled.
           ///

           /// Base64 presentation of the Form template.
           /// Absolute url of the site.
           /// Ture if the formtemplate can be browser enabled else False.

           public static bool IsBrowserFormTemplate(string templateMarkup, string url)
           {
               if (string.IsNullOrEmpty(templateMarkup))
               {
                   throw new ArgumentNullException("templateMarkup", "templateMarkup cannot be empty.");
               }


               if (string.IsNullOrEmpty(url))
               {
                   throw new ArgumentNullException("url", "url cannot be empty.");
               }


               try
               {
                   // Checking if the formsServiceProxyObj is null.
                   if (formsServiceProxyObj == null)
                   {
                       // Initializing the formsServiceProxyObj object.
                       CreateFormsServiceProxy(url);
                   }


                   // Calling the DesignCheckFormTemplate method to verify the form template.
                   // Storing the result in DesignCheckerInformation object.
                   // InfoPath 14 reflects the current InfoPath version.
                   DesignCheckerInformation designInfo = formsServiceProxyObj.DesignCheckFormTemplate(1033, templateMarkup, "InfoPath 14");
                   // Checking if the DesignCheckerInformation contains any error messages.
                   Message errmsg = designInfo.Messages.FirstOrDefault(i => i.Id == 1 && i.Type == MessageType.Error);
                   if (errmsg != null)
                   {
                       // The form template cannot be browser enabled.
                       return false;
                   }
                   else
                   {
                       // The form template can be browser enabled.
                       return true;
                   }
               }
               catch
               {
                   throw;
               }
           }


           ///


           /// Converts the given form template to Browser enabled form.
           ///

           /// SharePoint File object of the form template.
           /// Stores error message if an exception occures while conversion.
           /// True if the operation is successfull else False.

           public static bool ConvertFormTemplateToBrowserForm(SPFile formTemplate, ref string error)
           {
               if (formTemplate == null)
               {
                   throw new ArgumentNullException("formTemplate", "formTemplate cannot be null.");
               }


               try
               {
                   string webURL = formTemplate.Web.Url;
                   // Create the absolute URL to the file.
                   string fileUrl = SPUtility.ConcatUrls(webURL, formTemplate.Url);
                   // Do the solutions gallery cleanup before adding a new sandbox solution.
                   SharePointHelper.DoSolutionsGalleryCleanup(formTemplate.Web.Site.Url, string.Concat("_" + formTemplate.Name + "_"));
                   // Call the BrowserEnableUserFormTemplate method.
                   if (BrowserEnableUserFormTemplate(fileUrl, ref error))
                   {
                       // Rename the browser enabled form template file to template.xsn.
                       // This will ensure that all OOB links to the form template will be intact.
                       SharePointHelper.CopyAndRenameFormTemplate(formTemplate);
                       // Return true of the convrsion was successfull.
                       return true;
                   }
               }
               catch
               {
                   throw;
               }


               return false;
           }


           ///


           /// Creates an instance of the formssservice object.
           ///

           /// Absolute URL of the SharePoint site.
           private static void CreateFormsServiceProxy(string siteurl)
           {
               formsServiceProxyObj = new FormsServicesWebService();
               formsServiceProxyObj.Credentials = System.Net.CredentialCache.DefaultNetworkCredentials;
               // Setting the URL to point the current site's forms service.
               formsServiceProxyObj.Url = SPUtility.ConcatUrls(siteurl, "/_vti_bin/formsservices.asmx");
           }


           ///


           /// Calls the forms services BrowserEnableUserFormTemplate to convert the given form to browser enable.
           ///

           /// Absolute URL of the form template file.
           /// Stores error message if an exception occures.
           /// True if the operation is successfull.

           private static bool BrowserEnableUserFormTemplate(string formTemplateURL, ref string error)
           {
               try
               {
                   // Execute the web method and collect result in MessagesResponse.
                   MessagesResponse msgResponse = formsServiceProxyObj.BrowserEnableUserFormTemplate(formTemplateURL);
                   // Check if the MessagesResponse contsins any error message.
                   if (msgResponse != null)
                   {
                       if (msgResponse.Messages.Count() > 0)
                       {
                           // Initialize the error string with error response.
                           error = "Error converting the form to browser enabled.
    "
    + msgResponse.Messages[0].DetailedMessage;
                       }
                       else
                       {
                           // Successfull conversion.
                           return true;
                       }
                   }
               }
               catch
               {
                   throw;
               }


               return false;
           }
       }
    }
    The FormsServicesHelper class is the heart of the application and contains all the methods required for deploying the InfoPath form as sandbox solutions. The class acts as a wrapper over the Forms Services web service and contain the following methods:
    1. CreateFormsServiceProxyInitializes the proxy object of the Forms Services web service in the context of the current SharePoint site.
    2. ConvertStreamToStringHelper method which converts the given stream to the equivalent base64 encoded string.
    3. IsBrowserFormTemplate – Ensure whether the given form template can be browser enabled. This method accepts the base64 encoded string of the form template to be checked and calls the DesignCheckFormTemplate web method of the Forms Services web service. The resultant of this call is captured in DesignCheckerInformation object which is then evaluated to see if the form is convertible to browser form.
    4. BrowserEnableUserFormTemplateCalls the BrowserEnableUserFormTemplate web method of the Forms Services web service and converts the form template at the given URL to a browser enabled form. The response to this call is captured in the MessagesResponse object which is evaluated to check for a successful conversion. Error message during the conversion is assigned to a ref error object.A successful conversion in-turn deploys the InfoPath form as a sandbox solution to the current site collection.
    5. ConvertFormTemplateToBrowserFormDeploys the given SharePoint file object corresponding to the InfoPath form template as a sandbox solution. The method first of all internally calls the DoSolutionsGalleryCleanup method of the SharePointHelper class to check and remove any previously deployed sandbox solution for the same InfoPath form template. Further the BrowserEnableUserFormTemplate method is called to convert the form to browser enabled form. If the conversion is successful, then the CopyAndRenameFormTemplate method of the SharePointHelper class is called to rename the converted form template file as template.xsn.  Any error during the form conversion is initialized in a ref error object.


  • Build the solution.
  • At this stage we are done writing all the helper methods for supporting the form deployment as a sandbox solution. In the next steps we’ll wire the feature receiver with these helper methods and complete the deployment.
  • Open the EmployeeFormEventReceiver class and add the following using statements:
    using System.IO;
    using Microsoft.SharePoint.Utilities;
  • Further replace the commented FeatureActivated method with the one below:
    public override void FeatureActivated(SPFeatureReceiverProperties properties)
           {
               // Current web object.
               SPWeb currentWeb = null;

               try
               {
                   string error = string.Empty;
                   // Initializing the web object.
                   currentWeb = properties.Feature.Parent as SPWeb;
                   if (currentWeb != null)
                   {
                       // Turning on the unsafeupdates property to enable content update.
                       currentWeb.AllowUnsafeUpdates = true;
                       // Reading the InfoPath form template from the feature folder.
                       Stream formStream = properties.Definition.GetFile("InfoPathForms\\Published_Employees.xsn");
                       // Converting stream to base66 string format.
                       string formAsString = FormsServicesHelper.ConvertStreamToString(formStream);
                       // Checking if the desired form library exist and creating the SP object.
                       SPList formLibrary = currentWeb.Lists.TryGetList("EmployeeRecords");
                       // Checking if the form template can be browser enabled.
                       if (formLibrary != null && FormsServicesHelper.IsBrowserFormTemplate(formAsString, currentWeb.Url))
                       {
                           // Provisioning the form template to form library.
                           SPFile formTemplate = SharePointHelper.ProvisionFileToFormsFolder(formLibrary, formStream);
                           // Converting the uploaded form template to browser form.
                           if (FormsServicesHelper.ConvertFormTemplateToBrowserForm(formTemplate, ref error))
                           {
                               // updating the library's default content type's document template to the new form template.
                               SharePointHelper.ChangeContentTypeDocumentTemplate(formLibrary, "/forms/template.xsn");
                           }
                           else if (!string.IsNullOrEmpty(error))
                           {
                               // Transfer to error page with description.
                               SPUtility.TransferToErrorPage(error);
                           }
                       }
                   }
               }
               catch
               {
                   throw;
               }
               finally
               {
                   if (currentWeb != null)
                   {
                       // Turning off the unsafeupdates.
                       currentWeb.AllowUnsafeUpdates = false;
                   }
               }
           }

    The following section summarizes the activities in the Feature Activated event:
    1. The event starts by creating a reference to the current SharePoint web object and setting the AllowUnsafeUpdates web property to true. This will ensure that any update to the SharePoint database is made persistent.
    2. Next step reads the Published_Employees.xsn file from the Feature definition and creates a stream object formStream. The stream is further processed to create a base64 equivalent string.  
    3. In the next statement a reference to the target EmployeeRecord form library is created.
    4. If the EmployeeRecord library exists, a call is made to the IsBrowserFormTemplate method to ensure that this form is ready for browser conversion.
    5. If the above condition evaluates to true, then the formStream is provisioned as a SPFile to the EmployeeRecord form library.
    6. The SPFile reference to the uploaded form template is passed as a parameter to the ConvertFormTemplateToBrowserForm method for  deployment.
    7. If the deployment is successful, then the default content type of the EmployeeRecord form library is updated to point to the converted browser form template.
    8. If the deployment is a failure then the error during conversion is thrown as a message to the SharePoint error page.
    9. The finally block turns off the AllowUnsafeUpdates web property.
     
  • Build and deploy the solution.

  •  


    Viewing the sample application


    1. After the deployment is successful, navigate to the Solutions gallery of the target SharePoint site collection. The Published_Employees.xsn form should be visible as a Sandbox solution in the activated state.


    Figure 14: Solutions Gallery


    1. Also, navigate to the Manage Site Feature page under site settings of the team site created above. The feature Employee Record Form is visible and active.


     Figure 15: Employee Record Form feature activated
     
    1. Navigate to the EmployeeForm.aspx page created in the above section.
    2. Edit the InfoPath Form Web Part by clicking the link Click here to open the tool pane on the web part body.
    3. In the InfoPath Form Web Part tool pane, select EmployeeRecord under the List or Library dropdown.
    4. Click OK on the tool pane to accept the changes.
    5. This displays the Employee form in the browser.

     Figure 16: Employee Information Form in browser

     
    1. Click Add Record button on the form to add a new row to the table. This ensures that the managed code is working as expected.
    2. Click Delete Record button on the form to remove the first row from the table.


    Summary

    In this post, we have learned how we can leverage the SharePoint 2010 Forms Services Web Service to deploy an InfoPath 2010 Form template with managed code as a sandbox solution using VS2010.


    Tuesday, August 30, 2011

    Removing the OOB categories from the web part tool pane

    Often while developing custom web parts for SharePoint 2010 or MOSS, sometimes it is required to hide the OOB tool pane (for e.g. Appearance, Layouts or Advanced) from the end user.

    Trying for hours and scratching my head, I could not find any elegant way to achieve this. Finally I decided to use a hack via reflection.

    In my custom editor part class on the CreateChildControls() method, I am calling a method HideOtherToolParts. The HideOtherToolParts iterates over the control collection for this editorpart and checks if the type of the child control is Microsoft.SharePoint.WebPartPages.WebPartToolPart and accordingly hiding that child.

            protected override void CreateChildControls()
            {
                base.CreateChildControls();
                try
                {
                    this.HideOtherToolParts(this.Parent.Controls);
                    //other operations
                }
                catch
                {
                    throw;
                }
            }

            private void HideOtherToolParts(ControlCollection controls)
            {
                try
                {
                    foreach (Control toolPart in controls)
                    {
                        if (toolPart.GetType().FullName == "Microsoft.SharePoint.WebPartPages.WebPartToolPart")
                        {
                            toolPart.Visible = false;
                        }
                    }
                }
                catch
                {
                    throw;
                }
            }

    Hope this helps!

    Sunday, May 22, 2011

    Open a SharePoint Modal Dialog from an InfoPath Form - Live on SharePoint Developer Team Blog

    Recently I did a 5 part blog post on how to open a SharePoint Modal Dialog from an InfoPath Form on SharePoint developer team blog.

    Below are the links to all the 5 parts in the series-

    Friday, May 6, 2011

    InfoPath Form Sandbox Deployment Utility

    Deployment of an InfoPath form with code behind as a Sandbox solution can only be done using the InfoPath designer. But on a client’s production environment, it would be really difficult to use this approach for deploying InfoPath forms. So in order to mitigate this issue, the InfoPath Form Sandbox Deployment Utility can be leveraged.

    The InfoPath Form Sandbox Deployment Utility is a console application which can deploy any InfoPath form with/without code behind as a sandbox solution without requiring the InfoPath client itself. This utility can be used to deploy the InfoPath form locally or on a remote server provided the user running the application is the site collection administrator for the target SharePoint site.

    !!! Get Started
    * Download the InfoPath Form Sandbox Deployment Utility runtime.
    * Download the User Guide.

    Sunday, October 3, 2010

    Getting around the Firefox XMLHTTPRequest Cross Site Limitation

    In one of our recent project, we had a module where we need to access a web service hosted on a third party domain into our SharePoint application. Well this appears as one of those mundane tasks of adding a reference to the web service and using the web service proxy in the C# code behind unless your client asks you to provide a postback free experience and he does not have his production SharePoint servers configured with AJAX configurations.

    In this situation the only way you are left with is JavaScript hence we did the same. Now for accessing the third party web service we leveraged the XMLHttpRequest object to issue an HTTPGET request to the desired web method and accordingly use the response as returned back from the service.

    Everything was working like a charm until we tested our app in Firefox. Bang here goes app!!

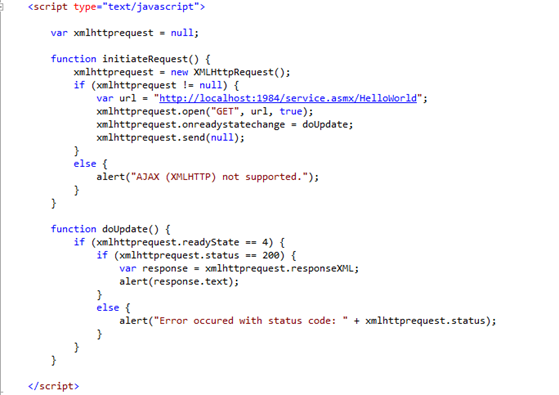
    Below is the JavaScript script that issues an XMLHttpRequest request directly to the to the web service

    Script_WebServiceCall

    In Internet Explorer the above script successfully calls the HelloWorld web method and displays the result.

    IE_WithoutProxy

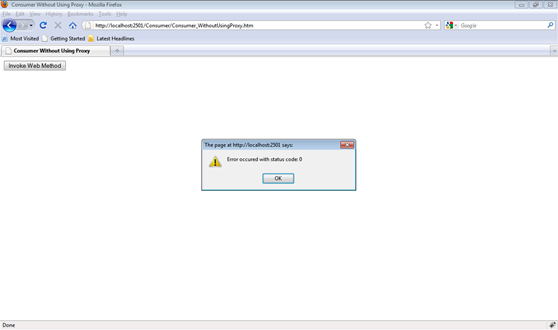
    However in Firefox you will receive an error with status code 0.

    FF_WithoutProxy

    Debugging this issue I found that I was always getting the xmlhttprequest.status code as 0 instead of 200. Now that was weird since the same code works fine in IE 7 & IE 8 but fails in Firefox. Moreover I couldn’t find any documentation for the 0 status code.

    Googling around this issue I found some explanation here

    The XMLHttpRequest object is subjected to the browser’s security “sandbox.” Any resources
    requested by the XMLHttpRequest object must reside within the same domain from which the
    calling script originated. This security restriction prevents the XMLHttpRequest object from
    requesting resources outside the domain from which the script was originally served.
    The strength of this security restriction varies by browser. Internet
    Explorer shows an alert stating that a potential security risk exists but gives the user a choice
    of whether to continue with the request. Firefox simply stops the request and shows an error
    message ..."

    Cutting the long story short it is no possible to access a web service on another domain/port via XMLHttpRequest object in Firefox.

    So finally we decided to adopt an alternative of creating a server side proxy (managed code) which would take up the task of communicating with the web service. Further our JavaScript code would remain as is but one change i.e. instead of requesting the web service, the script will issue an XMLHttpRequest to server side proxy who is apparently on the same domain and this approach worked flawlessly.

    Here is how the code behind for the proxy page would look like:

    ProxyPage_CodeBehind

    The above code is initiating the web service object (hellowrldsvc) and calling the required web method (HelloWorld). Further we are writing the result as returned by the web method back to the page response.

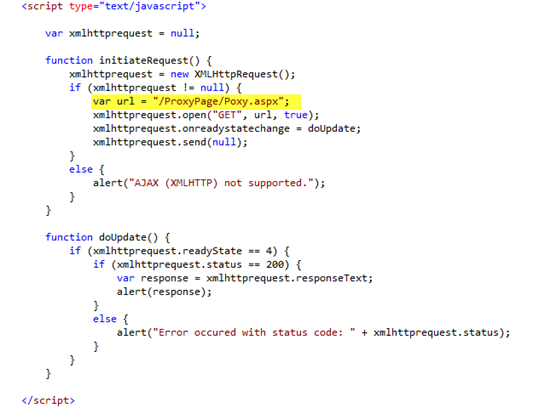
    Here is the updated JavaScript:

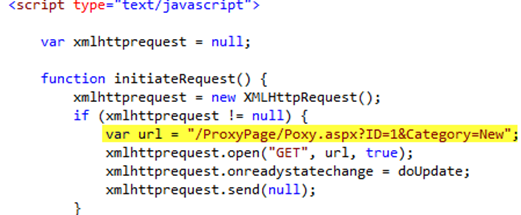
    Script_ProxyPageCall

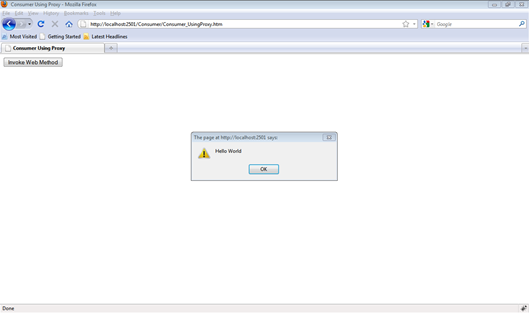
    Notice the url (as highlighted) is now pointing to the proxy page and the rest of the code is as is. Further upon executing the same, we get the result in IE and Firefox as shown below.

    In IE:

    IE_WithProxy

    In Firefox:

    FF_WithProxy

    If your web method requires some parameter to execute, then you can pass them in page query string (as shown below) and further in the proxy page code behind read them using Page.Request.QueryString.

    Script_ProxyPageCall_withQueryString

    In case you are dealing with SharePoint, I would recommend you to deploy the proxy page as a Layout page and update the url accordingly.

    Hope you will find this post helpful.

    The associated code behind and the Visual Studio 2010 project can be downloaded from here:

    Sunday, September 12, 2010

    SharePoint 2010 Pluggable Workflow Services – Part 2

    This is the second post in the series SharePoint 2010 Pluggable Workflow Services. In the first post I demonstrated creating a very basic sequential workflow and exposing a business object which we’ll be leveraging to communicate the information from the workflow. In this post we will dive into the nitty-gritties of a Pluggable Workflow Service.

    Creating a Pluggable Workflow Service

    Here comes the crux of this post of as how we can create pluggable workflow service.

    1. We will add new class file to our project and name is OrderTrackingService.

    2. Add the following namespace deceleration to the class.

    using System.Workflow.Activities;
    using Microsoft.SharePoint.Workflow;

    3. Now we will declare an interface IOrdertrackingService and add the following to the body of the interface.

    [ExternalDataExchange]
    public interface IOrderTrackingService
    {
    event EventHandler<OrderTrackingEventArgs> OrderTrackingEvent;
    void DispatchOrder(Order order);
    }

    So what we did above is we defined a method signature DispatchOrder which when implemented on a class would do the needful task of creating an order entry in the database. This method would then be further called from the workflow service CallExternalMethod Activity. Also after executing the DispatchOrder method raises the OrderTrackingEvent to notify the workflow that the service has completed its execution. The HandleExternalEvents workflow activity then takes care of the event arguments as passed by the OrderTrackingEvent.

    4. Add the following OrderTrackingEventArgs class.

    [Serializable()]
    public class OrderTrackingEventArgs : ExternalDataEventArgs
    {
    public OrderTrackingEventArgs(Guid id) : base(id) { }
    public string DeliveryStatus;
    }

    The above code indicates that we will be passing DeliveryStatus as an argument to HandleExternalEvents activity back in the workflow.

    5. Next on our OrderTrackingService class we will implement SPWorkflowExternalDataExchangeService and IOrderTrackingService interface.

    class OrderTrackingService : SPWorkflowExternalDataExchangeService,IOrderTrackingService
    {

    public event EventHandler<OrderTrackingEventArgs> OrderTrackingEvent;

    public void DispatchOrder(Order order)
    {
    throw new NotImplementedException();
    }

    public override void CallEventHandler(Type eventType, string eventName, object[] eventData, SPWorkflow workflow, string identity, System.Workflow.Runtime.IPendingWork workHandler, object workItem)
    {
    throw new NotImplementedException();
    }

    public override void CreateSubscription(MessageEventSubscription subscription)
    {
    throw new NotImplementedException();
    }

    public override void DeleteSubscription(Guid subscriptionId)
    {
    throw new NotImplementedException();
    }
    }

    Now let’s write the logic for DispatchOrder method. Here we will use LINQ to SQL and connect to the local ContosoOrderTracking database which you restored using the db script.

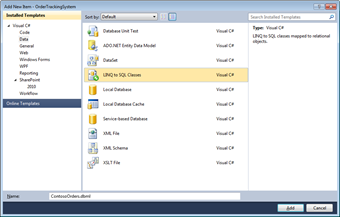
    6. Add a new item to the project of the type LINQ to SQL class and name is ContosoOrders.LinqToSqlClass

    7. Using the server explorer create a connection to the ContosoOrderTracking db.ServerExpplorer

    8. Drag and drop the ContosoOrder db table to the design surface.ContosoOrderTable

    9. Back in the OrderTrackingService class, update the DispatchOrder method to like this.

    public void DispatchOrder(Order order)
    {
    const string connection = @"Data Source=SHAREPOINT2010;Initial Catalog=ContosoOrderTracking;Integrated Security=True";

    using (ContosoOrdersDataContext contosoDataCntxt = new ContosoOrdersDataContext(connection))
    {
    try
    {
    ContosoOrder corder = new ContosoOrder();
    corder.Title = order.Title;
    corder.Quantity = order.Quantity;
    corder.Amount = order.Amount;
    corder.CutomerName = order.CustomerName;
    corder.ID = new Guid(order.ID);

    contosoDataCntxt.ContosoOrders.InsertOnSubmit(corder);
    contosoDataCntxt.SubmitChanges();

    order.DeliveryStatus = "Delivered";
    }
    catch
    {
    order.DeliveryStatus = "Returned";
    }
    }

    RaiseEvent(this.CurrentWorkflow.ParentWeb, this.CurrentWorkflow.InstanceId,
    typeof(IOrderTrackingService), "OrderTrackingEvent", new object[] { order.DeliveryStatus });
    }

    In the above code, we leveraged the LINQ to SQL to create a new entry in the ContosoOrder database. The order object as used in the above code would be supplied by the calling workflow. Also we are setting the DeliveryStatus property of the order object to Delivered if the database entry is created successfully else we set it to Returned indicating a failure.

    At the end we call the RaiseEvent method to notify the calling workflow of the completion of the service activity.

    10. The final piece to complete this puzzle is to implement the CallEventHandler method as follows.

    public override void CallEventHandler(Type eventType, string eventName, object[] eventData, SPWorkflow workflow, string identity, System.Workflow.Runtime.IPendingWork workHandler, object workItem)
    {
    if (string.Equals(eventName, "OrderTrackingEvent", StringComparison.OrdinalIgnoreCase))
    {
    var args = new OrderTrackingEventArgs(workflow.InstanceId);
    args.DeliveryStatus = eventData[0].ToString();
    this.OrderTrackingEvent(null, args);
    }
    }

    The CallEventHandler method gets called each time when the workflow service requests an event. Here we create the OrderTrackingEventArgs instance and pass in the workflow's instance ID to so the event knows which workflow it's invoking the event with. We next pass in the status message from the event receiver and finally invoke the event.

    This completes the workflow service here. Now we need to make our Order Tracking workflow be able to call this service.

    Updating the Workflow to call Pluggable Workflow Service

    1. Back in our Order Tracking workflow design surface; add the following activities as shown after logTOHistoryActivity1.

    WorkflowDesign


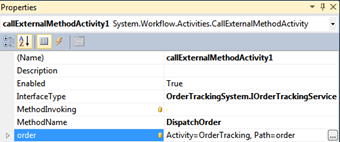
    2. After adding the above activities, select callExternalMethodActivity1 and set the following properties in the property pane as shown below.callExternalMethodActivity_1

    3. Now right click handleExternalEventActivity1 and Generate Handlers. Also set the properties as shown below.handleExternalEventActivity1

    4. For the property with the name e, we will bind it to a new activity field.bind_e

    Back in the OrderTracking.cs file we will remove the highlighted code.

    removecode

    5. Update the handleExternalEventActivity1_Invoked as shown below.

    public OrderTrackingEventArgs handleExternalEventActivity1_e1;
    private void handleExternalEventActivity1_Invoked(object sender, ExternalDataEventArgs e)
    {
    logToHistoryListActivity2.HistoryDescription = string.Format("Order delivered to the customer sucessfully.");
    }

    6. Back in our Order Tracking workflow design surface, right click codeActivity2 and click Generate Handlers.

    7. Update the codeActivity2_ExecuteCode method as follows.

    private void codeActivity2_ExecuteCode(object sender, EventArgs e)
    {
    SPListItem item = workflowProperties.Item;
    item["DeliveryStatus"] = handleExternalEventActivity1_e1.DeliveryStatus;
    if (String.Equals(handleExternalEventActivity1_e1.DeliveryStatus,
    "Delivered", StringComparison.OrdinalIgnoreCase))
    {
    item["InvoiceStatus"] = "Invoiced";
    }
    item.Update();
    }

    In the above code, we have used the value of the event arguments DeliveryStatus property to set list item’s delivery status field. Also we are checking if the order was delivered then raise the invoice to the customer.

    8. The final step in this entire flow is to add some configurations to the target web applications web.config file to make the web application aware of our pluggable workflow service.

    Add the entries below to the WorkflowServices tag under SharePoint section in the target web application.

    <WorkflowService Assembly="OrderTrackingSystem, Version=1.0.0.0, Culture=neutral, PublicKeyToken=YOUR_ASSEMLBLY_PKT" Class="OrderTrackingSystem.OrderTrackingService">
    </WorkflowService>
    webconfigchanges
    9. Hit F5 and deploy the solution.

    10. Running the workflow on the item we created previously.

    ItemStatus_final

    The history list shows the following updates.

    workflowhistoryupdate The Database receives a new entry via the Pluggable Workflow Service


    DatabaseEntry

    Hope this series helped you to understand some basic concepts of creating a Pluggable Workflow Services.


    The associated code and other resources can be downloaded from here:

    SharePoint 2010 Pluggable Workflow Services – Part 1

    Along with the many advancements and new features, SharePoint 2010 introduces a yet another important feature of Pluggable Workflow Services. While Pluggable Workflow Services have been around since Windows Workflow Foundation in .Net 3.5, its support was missing in SharePoint 2007. But now the SharePoint 2010 workflow engine supports it.

    So what’s a Pluggable Workflow Service all about?

    Here is what MSDN says:

    Pluggable workflow services provide a mechanism that allows external applications or components to programmatically communicate with workflow instances currently running on the server.

    This means that workflows in SharePoint 2010 now can interact with a wide variety of external events and allows a developer to control up to which point the workflow gets executed and waits for information from an external process.

    Now when you say that the workflow instance waits for information from an external process, it doesn’t mean that the workflow instance needs to wait in an active state and consume server resources (like CPU, RAM etc.) till the time it gets the response back. The workflow instance would be dehydrated (aka the state of the workflow instance would be written to the database) and rehydrated back (aka workflow instance state read back from the database) once the external activity gets completed.

    In this post I will attempt to explain a simple pluggable workflow service taking an order tracking system as an example. The order tracking system implements a sequential workflow which gets started as soon as a new order request is created. This workflow tracks the delivery status and the invoice status for a particular order.

    When a new order request is created (via SharePoint list), the workflow calls a pluggable workflow service which tracks whether the order was delivered to the customer or not (creating a new database table entry) and accordingly updates the workflow about this information.

    For running this example, you would need to

    • Restore ContosoOrderTracking.sql script for creating the ContosoOrderTracking database.
    • Create an Orders list using the Orders.stp list definition.

    Create a Sequential Workflow

    1. Open visual Studio 2010, Select New->Project.
    2. Under the installed templates, select the SharePoint -> 2010.
    3. Select the Empty SharePoint Project Template and enter the project name as OrderTrackingSystem and click OK.
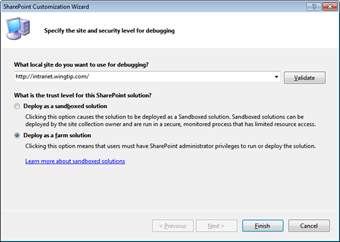
    4. Enter the target site collection name for debugging purpose. Now, since we are going to create a Visual Studio workflow, we need to deploy this solution as a farm solution. DeploymentType

    5. Click Finish

    At this point we have a bare metal SharePoint solution ready. Now we will add a new Sequential Workflow SPI (SharePoint Items) to this solution.

    6. Add a new item and select Sequential Workflow and name it OrderTracking.AddSequentialWF

    7. Click Add.
    8. Name the workflow as Order Tracking and leave the workflow type as List Workflow.WorkFlowType

    9. Click Next.
    10. From the library or list dropdown, select the Orders list (as shown below) which you created using the attached stp file and leave the other selections as is.SelectList

    11. Click Next.
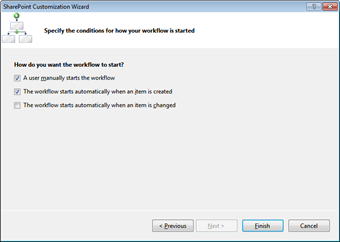
    12. We want this workflow to get started on new item creation as well as manually. Leave the current selections default and click Finish.ConditionToStart

    At this point our solution should look like as shown below. Before we move ahead, we would need to make some changes to this solution for consistency.SolutionStructure

    13. Rename the Feature1 to a sensible name as OrderTrackingWorkflow.

    At this point we are done creating a very basic SharePoint sequential workflow solution. You can optionally hit F5 to ensure that everything is fine which I am sure it would be J.

    Creating a Business Object

    Now we will need a custom business object “Order” which can encapsulate the order information and makes it easy for us to communicate with our workflow and the Pluggable Workflow Service.

    1. Add a new class Order to our workflow solution.
    2. We will add 6 properties to our order class representing the attributes of an order namely ID, Title, Quantity, Amount, Customer, DeliveryStatus.
    3. Since we are dealing with a workflow where persisting the object state is a must, we would need to make Order class Serializable by implementing ISerializable interface and decorate it with Serializable attribute.
    4. Also we would need to implement the GetObjectData method for serializing the object and the default constructer to deserialize it.
      At this point the Order class should look like this.
    5. using System;
      using System.Runtime.Serialization;

      [Serializable()]
      public class Order : ISerializable
      {
      public string ID { get; set; }
      public string Title { get; set; }
      public string Quantity { get; set; }
      public string CustomerName { get; set; }
      public string Amount { get; set; }
      public string DeliveryStatus { get; set; }

      public Order()
      {}

      public Order(SerializationInfo info, StreamingContext context)
      {
      ID = (string)info.GetValue("ID", typeof(string));
      Title = (string)info.GetValue("Title", typeof(string));
      Quantity = (string)info.GetValue("Quantity", typeof(string));
      CustomerName = (string)info.GetValue("CustomerName", typeof(string));
      Amount = (string)info.GetValue("Amount", typeof(string));
      DeliveryStatus = (string)info.GetValue("DeliveryStatus", typeof(string));
      }

      public void GetObjectData(SerializationInfo info, StreamingContext context)
      {
      info.AddValue("ID", ID);
      info.AddValue("Title", Title);
      info.AddValue("Quantity", Quantity);
      info.AddValue("CustomerName", CustomerName);
      info.AddValue("Amount", Amount);
      info.AddValue("DeliveryStatus", DeliveryStatus);
      }
      }

    Adding Life to thee Workflow

    Now we will add some activities to the sequential workflow we created above.

    1. Switch to the workflow design view and drag and drop a Code and LogToHistoryList activity on the design surface.WorkflowDesign_part1

    2. Right click in codeActivity1 and click Generate Handlers from the menu. This will add a code behind method for this activity.

    3. Back in the code create in instance of the Order class.

    public Order order = new OrderTrackingSystem.Order();

    4. Also the following code to the codeActivity1_ExecuteCode method.

    In the code below we are taking the current list item on which the workflow is running and initializing the order object with the required properties. Also we are updating the list item DeliveryStaus choice field to Dispatched indicating that the order has been dispatched to the customer.

    private void codeActivity1_ExecuteCode(object sender, EventArgs e)
    {
    SPListItem item = workflowProperties.Item;
    order.Title = item.Title;
    order.ID = item.UniqueId.ToString();
    order.Quantity = item["Quantity"].ToString();
    order.Amount = item["Amount"].ToString();
    order.CustomerName = item["CustomerName"].ToString();

    item["DeliveryStatus"] = "Dispatched";
    item.Update();
    }

    5. At this point it would be a good idea to update the workflow history list with a status message. Repeat #2 to generate handlers for logToHistoryListActivity1 and add the following code.

    private void logToHistoryListActivity1_MethodInvoking(object sender, EventArgs e)
    {
    logToHistoryListActivity1.HistoryDescription = "Order dispatched to the customer.";
    }


    6. Put a break point in codeActivity1_ExecuteCode hit F5 to deploy and debug the solution.


    Now let’s add a new item to the Orders list and see if the workflow is functioning properly.

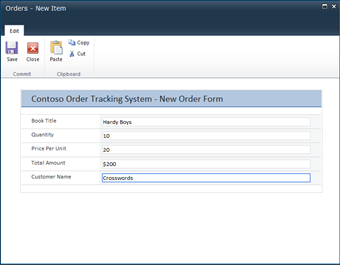
    NewItem

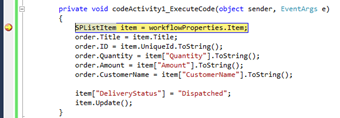
    As soon as you save the above item, the break point in our workflow gets hit where you can further play around and see the runtime properties of the objects. Further hit F5 to come out of debugging mode.

    DebugCode

    This will complete you workflow on the item you created above and now the DeliveryStatus field shows Dispatched. Also the workflow status field show Completed.

    ItemStatus

    Also clicking on this Completed link will navigate you to page below where you can see the status page of the workflow where we can see the comments in workflow history.

    WorkflowStatus

    In the next post we will dive into the details of creating a Pluggable Workflow Service.

    The associated code and other resources can be downloaded from here: